
 As an avid user and lover of technology, it’s no surprise that the actual computer I have at home is self-built. I’ve been building computers since I was in college and always enjoyed trying to get the best out of my system whenever possible.
Most of the computers I have built were pretty normal and uncool. With the exception of a few stickers here and there, there was never anything really spectacular or that inspired “oooh’s and awww’s” from people.
If you become an avid computer person, it’s not likely that you’ll want to get into the case mod and speciality act but a lot of people, including myself, do. Most people who own computers are satisfied with what they get. Enthusiasts want to change things and make them better.
Some of us enthusiasts end up with kickass systems and don’t know what to do next, so it becomes necessary to make the computer just plain look cool.
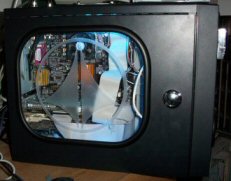
Quite awhile back, I saw a review for a Strategem system from Wahoo Computers. I took a particular liking to that case. It’s a cube style case with a massive amount of drive bays and lots of potential for mods.
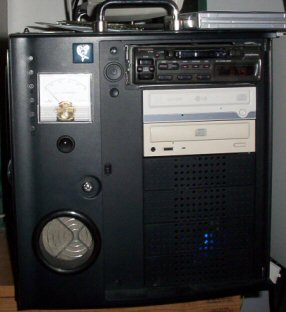
I didn’t have the cash to buy just the case, so I kept the link around and knew that at one point, I’d buy it, when I could afford it. Eventually, I came into some extra cash, shelled out the $650 for the case (case only, no power supply). It did come with the window kit, a pile of fans, chrome handles, and even brass thumbscrews. It took an eternity for the case to arrive, but when it finally did, I was a happy camper. The picture you see up to the left, is the earliest picture I could find of the case. It does have one mod on the front of it which I’ll be explaining shortly.
The only thing was, with all of those drive bays, and with the cool looking case window, I felt the need to add more. One thing that I started to notice was that as soon as you get into having a cool case, you want to make it more cool and add more stuff to it. So, I began scouring the internet for new mods I could make to the case. I found out quite quickly that there’s a LOT of sites out there that have a lot of different mods. The only thing was, most of the mods were relatively the same. Most of them were just different cut windows, with different lights. Although those are cool, I wanted something unique. I did find one mod that hooked an analog tacometer to your system and it measured your CPU usage. As the usage increased, the needle on the tacometer moved. It was a cool idea but I didn’t want to fork out the cash for it.
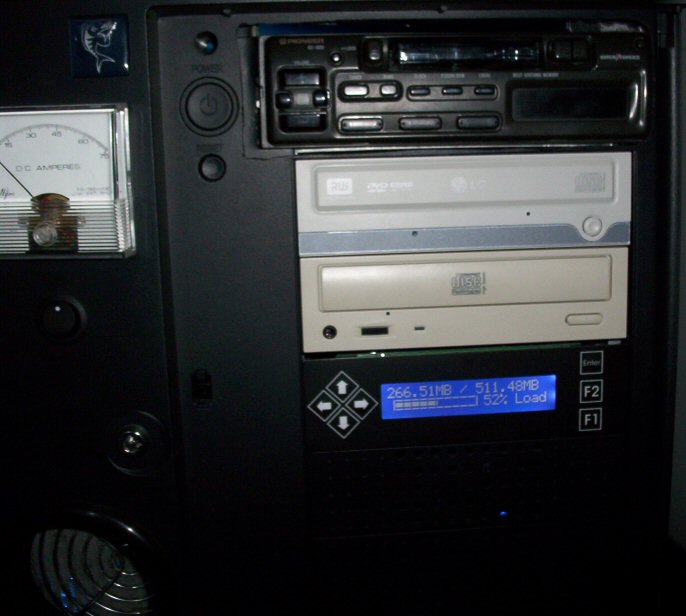
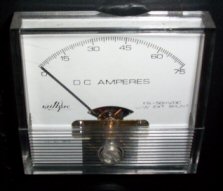 After scouring through pages and pages of lights and windows, I found one page where I guy had taken an old analog stereo VU meter and hooked it up to his system and used it as a hard drive activity indicator. Most computers have a red blinking light that flashes when the hard drive is in use. With this, the analog meter would move when the hard drive was in use. I thought that was a great idea, but I had no access to any VU meters and the instructions he gave were sort of intimidating to me. So, I was at work and went down to the maintenance department and asked one of the electricians if he had anything like that. He did. In fact, he said that it was an old analog DC meter that he barely ever used and could get rid of. I took it back to my office and dug out a test computer, spliced a few wires, and hooked it to a motherboard’s hard drive connector. When the system powered on, the needle started moving. I had something. It only took a little bit of soldering and some sheath to make it look good, then I got it mounted on the case. Once it was all said and done, it looked pretty cool when it was working.
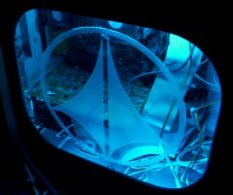
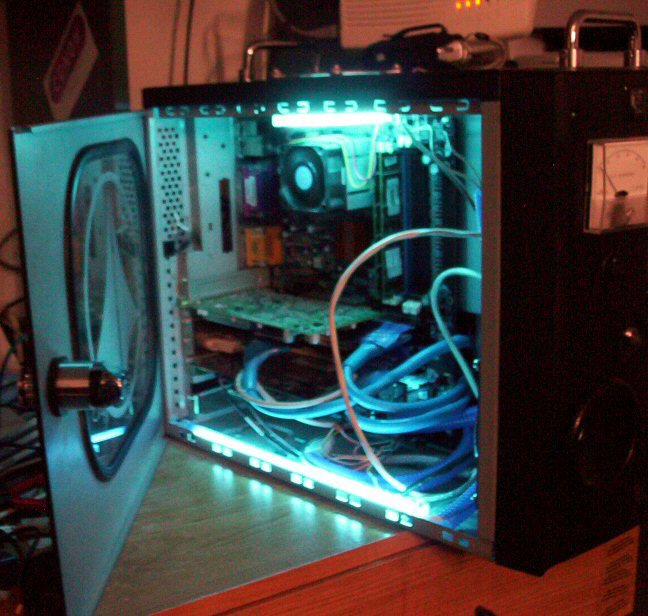
Well, that was it, I then started going nuts with the mods. I bought some bubble lights and mounted them but found it didn’t produce enough light so I bought a cold cathode and mounted that. I bought a biohazard fan grill and a UV blue glowing fan for the top fan so it would shine blue light through the top of the case. I also decided to etch a Robotech logo into the window as a lot of cool mods have an etched logo. Unfortunately, the window is not real glass so I ended up using glass frosting to create the etch effect. It worked wonders and I was very impressed.

So after having done all that, I really wanted to have something unique in the front of the case. Specifically, in the drive bays. I thought about adding more drives but that just seemed too lame. I wanted to buy an LCD display but I couldn’t find anything good at the time. Then, after having a conversation with some friends of mine, it struck me. A mod that I hadn’t seen done before. Installing a car stereo in a PC. Not a CD stereo, a tape deck.
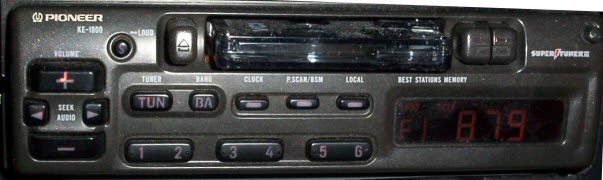
I thought the idea was really cool and unique, so I started going nuts trying to find my old cassette deck from my Ford Tempo. Sure enough, I found it and it would fit, but some serious case mangling would have to take place. I’d also lose my spot for a 3.5″ drive and the external connectors I had bought. It didn’t matter. I wanted the deck in.
The wiring was the first thing I took care of. I wanted to be able to pipe the output of the tape deck into the AUX input on my sound card. It seemed easy enough to do. Take an old CD audio wire used for CDROM’s, and splice the outputs from the tape deck, onto the CD wire. The only other problem I had was feeding the deck power. I knew I could splice power off one of the extra molex splitters I had laying around. I had some difficulty finding the proper wires to splice into (I’m no electrician) but once I got it working, it powered on easily. Now it was just a matter of getting the deck mounted in the case right.
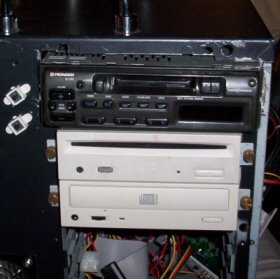 I am by no means the kind of guy who can tear apart a metal case to make it fit a tape deck. I don’t have any hack saws or tools that can do that. So thanks to the assistance of my friend Chris Clarke, he was able to gut the top part of that case using a hacksaw and some other tools, to fit the deck in the right spot.
It was a long process getting the sizes just right so that the deck would fit in there nice and snug, and not have anything too lose. We even managed to line it up with the screw holes on the motherboard side of the case so the deck could actually be secured in. It turns out that wasn’t necessary because the deck is in there so tight, it ain’t going to be falling out any time soon.
 Organizing the wires and getting everything hooked up was easy. I put all the pices to the case back together, brought the case home, and plugged it in. The system booted up, and I fired up the tape deck and played Faith No More’s “King For A Day” cassette through my computers sound system. I gotta say, it kicked ass. However, about 5 minutes of having the deck on was enough for the system. The power supply kicked off and the computer would not power on again. I thought I had blown the power supply, but it was still usable. Turns out there isn’t enough juice to power the deck when the neon lights are on. I have since tried to install a new 450w power supply but the one I bought won’t reach the motherboard because of the way the case is layed out. So, I’ve settled for turning the lights off when I want to use the deck, until I can get a power suplpy that will reach. I nice compromise.
So now that I had accomplished something new and unique, I wanted to add more (of course). So the first thing I went and did was buy a Matrix Orbital LCD display. I saw this on some mod page and thought it was the best LCD display out there that wasn’t dedicated to fan speeds and temperature. It was easier than hell to install and looked seriously kickass once it was there.
 I also decided to buy some rounded cables and cable loom to tidy up and clean the look of the wires. After installing all of it, it didn’t help much, but it did group a lot of the smaller wires together to make things look somewhat cleaner and have a neat look to them.
So after all of this work, I finally have a good case, that looks cool, has some neat, original mods to it, and I can sit back and enjoy it’s splendor. HA! Not likely! I’ll probably find more useless stuff to jam into it, and at one point or another, I will get the new poer supply in it so I can use that deck whenever I want. Here’s a couple of pictures of the final product. Click them for a bigger view.