
Since I started working on this project again, I thought I would post a small little page about my work. Here’s the idea.
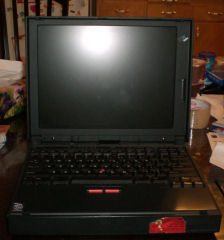 On the left here is an IBM Thinkpad 380D. It’s old. Only has 32MB of RAM in it, Windows 98SE, and about 2 gigs of drive space. Not much of a computer, but let me tell you, it would do the job.
The idea is that this is an old laptop that seems pretty useless but I had the idea of trying top find a way to convert this laptop into a digital picture frame. I could load a pile of various digital photos onto the drive, and have them run like a slideshow to show them off. I would of course have to find a way to mount the laptop into some kind of frame. So, at first I loaded all of the software I needed, and copied a bunch of photos onto the machine’s hard drive and made sure it would play them correctly. Sure enough, they did.
The laptop then sat on my desk for a long time. Like two years or so. For some reason, recently I felt compelled to take the project on again and started doing more research. When I first had the idea, there wasn’t much online for reference material but this time I found lots. It seemed the first thing I would need to do would be to remove the LCD screen from the laptop and find a way to use it without the casing.
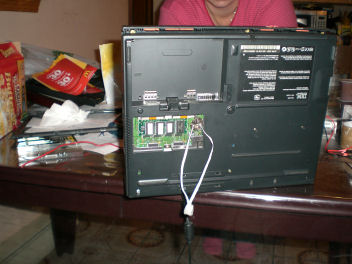 I very carefully took the case apart and managed to get the LCD out. But when the time came for me to boot the computer and see if the screen was still working, I ended up with some weird error messages. It kept telling me that the date had been reset. So I figured I’d look up the error codes on the net and as I suspected, the battery was the cause. Now, unlike most computers, this one would not boot without a valid CMOS battery. So, I wanted to see if the machine was still functional but nothing was open at the time so I decided to try and find a way to boot it with the use of another battery. Using two twist ties as wires, and a battery from a laser pointer I had, I rigged up a battery to the machine and sure enough, the computer booted without an error and I was on my way to continuing on with my work.
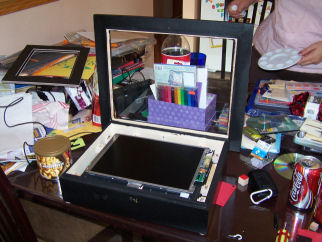
The next part would involve finding a way to mount the LCD display into something. Now, I didn’t want to go as far as ripping the entire laptop apart, so the most logical thing to me was to find a way to mount the LCD screen onto the back side of the laptop. I would not be using the battery, and it was a relatively flat surface. So, after pulling out a whole lot of the inside of the machine and taking out what seemed like dozens of screws, I was able to release the laptop screen so that I could move it. Thankfully there was enough cord in the connection wire that it would very easily be mountable on the back.
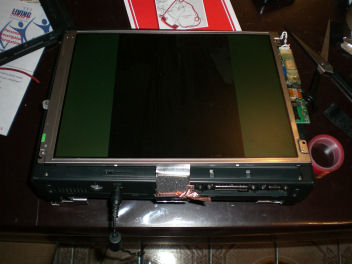 Tamara gave me some double sided tape which didn’t work too well but the velcro she got was even better and did the job perfectly.
The next logical step now that I had a working machine with the LCD mounted as I wanted it, was to find a way to put this into something nice. We had experimented a bit with finding some frames and mats to put along the outside but ultimately, you would still see the laptop. Tamara, with her crafty background, had the best idea. A shadow box.
A shadow box is like a photo frame and memory box all combined into one. They come in different sizes and different depths.
We went up to the local Kent’s on a Saturday afternoon and checked what they had but with very little luck. We went down to Michael’s and looked at what we had. After arguing with the sales clerk about whether she could take the plastic off, we managed to try one of the boxes they had there and it looked like it would be a perfect fit.
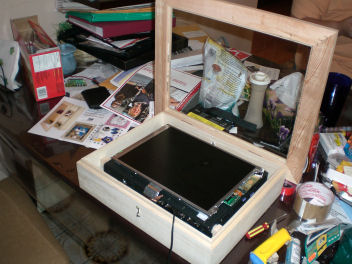 The shadow box opens at the top and the laptop fit perfectly on the inside. The only downside is that there is not a lot of room on either side. Normally this would not be a big deal, but I wanted to be able to install a wireless network card that I could use to copy photos to the laptop with. This would ease the pain of having to take it out every time I wanted to change the photos. Well, the wireless card hasn’t arrived yet and I am still a bit worried.
At this point, we now have to drill a hole in the bottom of the box for the power cord, and actually mount the laptop in there in such a fashion that it won’t shift when mounted on the wall. This should not be a hard thing to accomplish but it will take some creativity and patience.
As I indicated previously, we did indeed drill a hole on the bottom of the box for the power cable to come through. We also drilled a second hole which was originally going to be used to allow a mouse to be connected to the laptop. This was so that some functionalty could be done with the machine, without having to remove anything. However, things changed as I decided I wanted to remove Windows from the machine entirely, and simply go with something that would run much faster. DOS. So, for now there is an unseen extra hole drilled under the bottom of the shadow box.
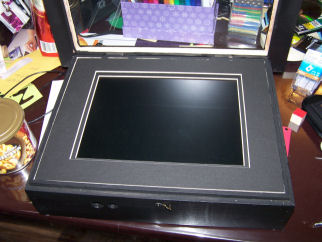
 As you can see from this photo, the box has now been painted black and if you look close enough, you can see the small little wooden blocks that have been placed along the side of the laptop, inside the box itself. The purpose for the blocks is to help brace the laptop into a center position, and to help it from slipping from side to side.
There are actually two blocks glued to the underside of the laptop which keeps it pushed off the back of the box. There’s also three smaller blocks glued to the very front of the laptop so that they serve as a brace for the bottom of the frame. Finally, there are three blocks on each side (left and right) which help keep the laptop centered in the middle of the box.
The only braces that are permanently attached are the braces attached to the underside, and to the bottom of the laptop. It made more sense to secure only those ones as the ones on the side could feasibly make it harder to put the laptop back in the box should it be removed. This way, when I need to service the machine, I remove the top and side braces, and the whole thing comes out very easy. I have to give credit to my wife Tamara for the awesome paint jobt, and the suggestion of the blocks. Who knew a crafty person could help with a geek project?
 The next part of the project required a way to conseal the LCD screen on the inside of the shadow box. This could have been done very easily with black construction paper which could then be glued around the edges or around the glass frame. However, once again the wife had a great suggestion and we got a matte cut that fit the screen and box exactly.
Now, I do have to mention that I was kind of irritated by the fact that it took the guy who did it way too long to get this done. In the end, it may have taken him about an hour or so but I was without the laptop and box for over a week and let me tell you, I didn’t feel good about it. I was nervous the thing would come back in pieces and non-functional, but as you can see from the photo, the matte turned out very nicely. The matte fits the box perfectly and sits right on top of the screen with no issues.
In this photo, you can actually see the two drill holes on the bottom. The one on the right is where the power cable comes out and the other one was for the mouse.
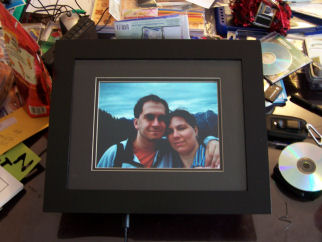 At this point I should mention a decision that I made regarding the way the frame would operate. Originally, this laptop had Windows 98SE on it. Pentium 150 with 32MB of RAM does not run 98 very well but it did work. It also supported the PCMCIA wireless card adapter that I bought. The original idea was to be able to remote into the laptop to change the photos from time to time. However, as it turns out, this laptop and 98 did not like the wireless card at all. With that out the window, I decided to go with using DOS instead of Windows to run the whole thing. DOS was faster to boot, and less resource intensive (generating less CPU cycles = less heat) so I wiped Windows from the machine, and simply used a DOS/98 Console mode boot to service the laptop. This has GREATLY enhanced the frame. Boot time is under 10 seconds, and I have zero hassle with a mouse or anything else. I used a DOS application called DISPLAY which works very well in the 98 console mode. When all is said and done, you can see by this photo that it works just as well as Windows ever would have.
This photo was taken after I got DOS working properly. I had some issues with the images displaying dithered (pixelated) but this was due to the software defaulting to 8bit mode. Once I corrected that, the images displayed beautifully. I also had one other minor problem that did cause me some concern. When I took the frame over to my parents place to show them mine and Tamara’s handywork, I noticed after one hour, the screen went blank. This indicated that the laptop had some sort of power save mode which Windows disabled for me but I wasn’t sure how to disable it with DOS. Thankfully there are still DOS utilities around for this old computer and I found the Thinkpad program to turn on presentation mode, which disabled the power saving function.
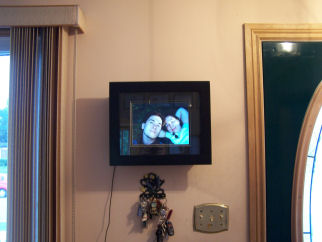 The last thing required for this beastie was to get it hung on the wall. After all is said and done, this frame weighs just under 6 pounds. I needed to make sure whatever I used to hang this would work well. Tamara bought some planters hooks and some attachments for the frame. The attachments were perfect but the hooks would have stuck out a lot. I opted for some good old fashion screws and wall anchors. Since I was putting this stuff into drywall, I knew I had to use anchors. I tried it without and I could already see the screws pulling out of the wall. Anchors seem to correct this issue .
This last photograph shows the frame hanging in our front living room by the door. I measured it out, levelled it, and hung the beastie up and sure enough, it looks and works beautifully. Now we’ll wait and see if it comes crashing down after awhile 😉
For those of you who may want to try this yourself, here’s a list of everything we used/bought/had to accomplish this nice little combination of craftwork, and geekwork.
- 1 old laptop, with hard drive & cdrom drive
- 1 shadow box large enough to hold laptop
- 1 bag of big wood blocks, each block about 1 cubic inch
- 1 bag of small wood blocks, each block about .5 cubic inches
- 1 matte, specially cut to fit
- 1 bottle of black craft paint
- 1 bottle of paint sealer
- 1 package of velcro strips
- 1 roll of double sided tape (heavy duty kind)
- 1 rotary tool (for drilling holes)
- 1 picture hanging kit w/ anchors
- 1 pack of felt pads (usually used for furniture on hard wood floors)
I think that covers it. I also used “disp189b.zip” which I found in some Google search for displaying the photos in a slide show. It did require that all images be sized to 800×600 which was easily done with a script in Paint Shop Pro.
If you would like more information on how I built this, please do not hesitate to contact me.